Element는 HTML로 작성한 태그들을 의미합니다. 웹페이지의 가독성을 높이기 위해서는 이러한 태그들을 적절하게 화면에 배치해주어야 하는데요, CSS의 display, position, float 속성을 활용하면 기초적인 레이아웃을 구성할 수 있습니다.
대표적으로 위 세개의 속성들은 다음과 같이 정의할 수 있습니다.
1. display 속성 || display:block; display:inline; display:inline-block;
2. position 속성 || position:static; position:absolute; position:relative, position:fixed;
3. float 속성 || float:left; float:right
1. display
아래와 같이 HTML을 작성하여 세개의 박스를 만들어보도록 하겠습니다.
<!DOCTYPE html>
<html>
<head>

</head>
<body>

  <div class="box1">box1</div>
  <div class="box2">box2</div>
  <div class="box3">box3</div>

</body>
</html>
그리고 css style을 다음과 같이 적용해주었습니다.
.box1,.box2,.box3{
  box-sizing: border-box;
}
.box1{
  width: 50px;
  height: 50px;
  background-color: red;
}
.box2{
  width: 50px;
  height: 50px;
  background-color: yellow;
}
.box3{
  width: 50px;
  height: 50px;
  background-color: green;
}
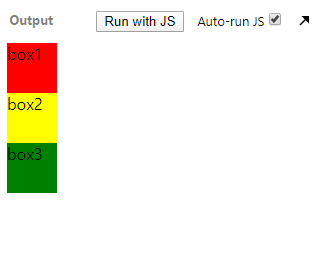
그러면 아래와 같이 렌더링됩니다.
가. block
div태그는 기본적으로 display 속성이 block입니다. 그렇기에 위의 기본 div 박스 렌더링이 위와 같이 되는 것입니다. div태그 외에도, p태그, h태그, li태그 등이 이 속성을 기본적으로 가지고 있습니다. block은 블록하나를 층마다 쌓는 것처럼, 기본적으로 display 속성이 block인 태그는 한 태그가 가로영역을 모두 채우게 됩니다.
위의 css코드 중 box1, box2, box3 의 display 속성을 아래와 같이 block으로 설정해주면
.box1,.box2,.box3{
  box-sizing: border-box;
  display: block;
}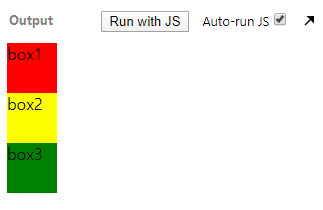
이렇게 정렬됩니다.
block은 가로, 세로 길이를 지정해줄 수 있기 때문에, width:50px; height:50px가 그대로 적용이 되었습니다.
나. inline
기본적으로 span태그, b태그, i태그, a태그 가 inline 을 지니고 있습니다. inline은 층을 쌓는 것이아니라, 이전 태그의 가로영역에 함께 속하게 됩니다. 층을 쌓기보다는 옆으로 확장해나가는 것이죠. 줄바꿈이 되는 것을 방지한다고도 말할 수 있겠습니다.
box1, box2, box3 의 display 속성을 inline으로 설정해주겠습니다.
.box1,.box2,.box3{
  box-sizing: border-box;
  display:inline;
}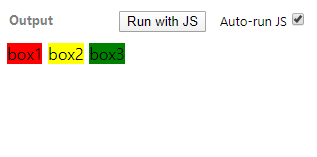
이렇게 정렬됩니다.
inline은 가로와 세로의 길이를 지정해줄 수 없습니다. 그렇기 때문에 .box1, .box2, .box3의 width와 height 속성이 무시되는 것이죠. div의 크기는 div태그 안에 써주었던 글씨의 전체 크기와 동일하게 설정됩니다.
다. inline-block
.box1,.box2,.box3{
  box-sizing: border-box;
  display:inline-block;
}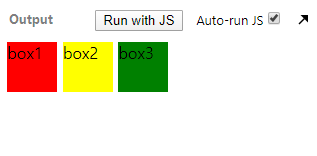
이렇게 정렬됩니다.
보시는 바와 같이, width와 height속성을 가지면서도(50px) 동시에 inline 처럼 같은 가로영역에 위치하고 있습니다.
라. none
display의 속성 중에는 none 이 있는데, 이는 요소를 렌더링하지 않도록 설정합니다. visibility 속성을 hidden으로 설정하면, 태그가 안보일뿐, 영역은 그대로 차지하는데 반해, none은 영역도 차지하지 않는다고 합니다. box1의 display 속성만 none으로 하고 나머지는 inline-block으로 설정해보겠습니다.
.box1{
  display: none;
  width: 50px;
  height: 50px;
  background-color: red;
}
이렇게 정렬됩니다.
box1과, div태그가 차지하는 영역이 사라진 것을 볼 수 있습니다.
2. position
<!DOCTYPE html>
<html>
<head>

</head>
<body>
  <div class="object"></div>
  <div class="container">
    <div class="box1">box1</div>
    <div class="box2">box2</div>
    <div class="box3">box3</div>
  </div>
</body>
</html>
.object {
width: 50px;
height: 50px;
background-color: pink;
}
.container {
display: inline-block;
background-color: black;
width: 200px;
height: 300px;
}
.box1,.box2,.box3{
box-sizing: border-box;
display:inline-block;
}
.box1{
right: 0;
width: 50px;
height: 50px;
background-color: red;
}
.box2{
width: 50px;
height: 50px;
background-color: yellow;
}
.box3{
width: 50px;
height: 50px;
background-color: green;
}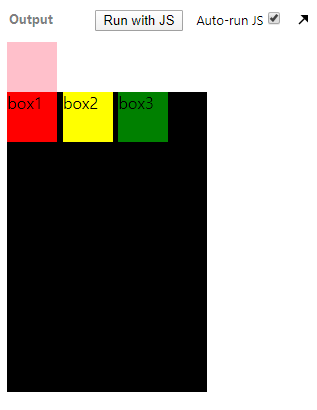
position 속성을 살펴보기 위해 HTML과 css를 이렇게 설정해주었습니다.
가. static
특별한 position속성을 지정해주지 않으면, 모든 태그가 기본적으로 가지고 있는 position속성이 바로 'static' 입니다. 그래서 위의 HTML의 모든 태그를 position : static; 으로 지정해주어도 위와 똑같은 렌더링 결과가 나오는 것이죠.
.object {
  width: 50px;
  height: 50px;
  background-color: pink;
  position: static;
}
.container {
  display: inline-block;
  background-color: black;
  width: 200px;
  height: 300px;
  position: static;
}
.box1,.box2,.box3{
  box-sizing: border-box;
  display:inline-block;
  position: static;
}
.box1{
  right: 0;
  width: 50px;
  height: 50px;
  background-color: red;
}
.box2{
  width: 50px;
  height: 50px;
  background-color: yellow;
}
.box3{
  width: 50px;
  height: 50px;
  background-color: green;
}
나. relative
position 속성 중 relative는 'position : static; '으로 설정되었을때의 자신의 위치로부터 상대적으로 top, left, bottom, right 속성을 지정해줄 수 있습니다. box1의 position 속성을 relative으로 설정하고 top 속성을 20px으로 설정해주겠습니다.
.box1{
  right: 0;
  width: 50px;
  height: 50px;
  background-color: red;
  position: relative;
  top: 20px;
}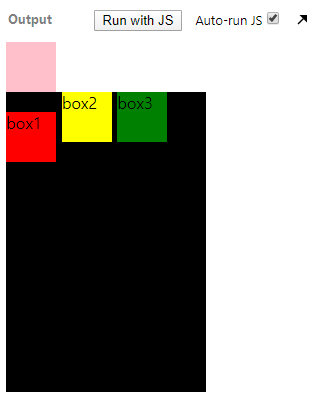
이런 식으로, 원래 자리로 부터 20px 아래로 내려온 것을 볼 수 있습니다. static에 대해 상대적인 것이기 때문에, 기존의 static의 '상대적'설정도 그대로 유지 됩니다. 그말인 즉슨, box1의 영역이 그대로 유지된 채 box2와 box3가 렌더링 된다는 것이죠.
다. absolute
position 속성 중 absolute 는 '상위 태그'와 관련이 있습니다. absolute로 position 속성을 지정해주면, 상위 태그로 거슬러 올라가며 position 속성이 static이 아닌 태그를 찾고, 그 태그에 대해 '상대적'으로 top, left, bottom, right 속성을 지정해줄 수 있습니다. 만약 찾지 못한다면, 최상위 태그인 body에 대해 상대적으로 움직이게 됩니다. 여기서 중요한 점은, 더이상 position: static에 구애받지 않기 때문에 '독자적'인 위치를 갖게 되며, 이에 따라 기존의 static일때 갖고 있던 영역이 '사라진다'는 것이죠.
일단 box1의 position 속성을 absolute로, right를 0으로 설정해보도록 하겠습니다.
.box1{
  right: 0;
  width: 50px;
  height: 50px;
  background-color: red;
  position: absolute;
}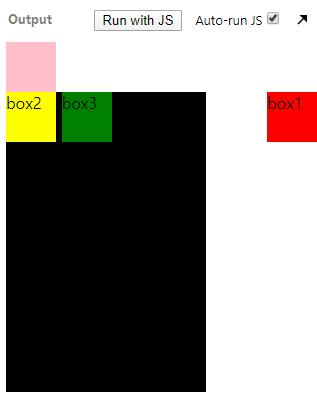
이런 식으로 box1이 화면의 가장 오른쪽에 위치하게 되는 것을 볼 수 있습니다. 아까전 언급한 바와 같이 absolute로 설정해주면, 상위태그 중 static이 아닌 태그를 찾는데, 여기서는 상위태그 container가 static이므로 결국 body에 상대적이게 되는 것입니다. 그렇기 때문에, body에서 상대적으로 right : 0 인 위치로 box1이 렌더링 됩니다.
또한 box1의 원래 영역이 사라지기 때문에, box2와 box3이 앞으로 당겨져서 렌더링 되는 것 또한 볼 수 있습니다.
container을 static이 아니도록 만들어 주기 위해서 relative로 설정해주면,

.container {
  display: inline-block;
  background-color: black;
  width: 200px;
  height: 300px;
  position: relative;
}
이렇게 div.container에 대해 상대적인 위치 값을 가지게 됩니다.
라. fixed
fixed는 상위태그와 관련없이 viewport(전체화면)의 좌측 상단에 대해서 상대적으로 움직입니다. 또한 다른 태그들에 대해 영향을 받지 않게 됩니다. object와 box1의 position 속성을 fixed로 설정하고, 위치를 지정해준 결과 입니다.
.object {
  width: 50px;
  height: 50px;
  background-color: pink;
  position: fixed;
  left: 100px;
  top: 100px;
}
.box1{
  right: 0;
  width: 50px;
  height: 50px;
  background-color: red;
  position: fixed;
  left: 100px;
  top: 200px;
}
이런 식으로, 다른 태그에 구애받지 않고 자신의 위치를 가지게 됩니다.
여기서는 container와 object가 겹치게 되었는데, 어떤 요소가 상위에 올라올지는 어떻게 결정되는 것일까요? 바로 z-index 때문입니다. z-index를 사용하면 어떤 요소가 상위에 올라올지를 결정해줄 수 있습니다.

'events > 부스트코스' 카테고리의 다른 글
| [부스트코스] 1. 웹 프로그래밍 기초 | 4. 개발환경 설정 - BE | 5) Tomcat 다운받기 및 설치하기 (0) | 2020.02.20 |
|---|---|
| [부스트코스] 1. 웹 프로그래밍 기초 | 4. 개발환경 설정 - BE | 3) 이클립스 다운받기 및 설치하고 인코딩 설정하기 (0) | 2020.02.14 |
| [부스트코스] 1. 웹 프로그래밍 기초 | 1. Web개발의 이해 -FE/BE | 7) WAS (0) | 2020.02.07 |
| [부스트코스] 1. 웹 프로그래밍 기초 | 1. Web개발의 이해 -FE/BE | 6) 웹서버 (0) | 2020.02.06 |


댓글